
Setup secure boot
The NVIDIA Tegra boards come with full support for the Secure Boot specification, but do not come with any pre-loaded certificate in the firmware.
This document is intended to serve as a step-by-step guide for setting up Secure Boot for use with Ubuntu Classic and Core on Jetson. Our Secure Boot implementation will specifically only cover UEFI Secure Boot and not Firmware Secure Boot which is also supported on Jetson Tegra platforms. However, implementing this would require the burning of fuses which is an irreversible process, and thus should only be done on production devices and by following the NVIDIA documentation.
UEFI Secure Boot will validate all binaries loaded by the UEFI boot firmware but no boot codes running before that.
Generating and downloading the keys
We need to manually generate a PK (Platform Key), KEK (Key Exchange Key) and a DB (Database Key). In addition to that, we need to provision a Microsoft KEK and DB since these will be needed to validate shim. During the boot process, shim will introduce Canonical certificates which will be used to validate grub and the kernel.
Download the 2023 Microsoft DB and KEK:
wget -O msft_db_2023.der https://github.com/microsoft/secureboot_objects/raw/refs/heads/main/PreSignedObjects/DB/Certificates/microsoft%20uefi%20ca%202023.der
wget -O msft_KEK_2023.der https://github.com/microsoft/secureboot_objects/raw/refs/heads/main/PreSignedObjects/KEK/Certificates/microsoft%20corporation%20kek%202k%20ca%202023.der
Download the 2011 Microsoft DB and KEK:
wget -O msft_db_2011.der https://github.com/microsoft/secureboot_objects/raw/refs/heads/main/PreSignedObjects/DB/Certificates/MicCorUEFCA2011_2011-06-27.der
wget -O msft_KEK_2011.der https://github.com/microsoft/secureboot_objects/raw/refs/heads/main/PreSignedObjects/KEK/Certificates/MicCorKEKCA2011_2011-06-24.der
The first step is always to download and extract the latest NVIDIA BSP for Tegra.
Inside the BSP, we need to create a new directory for the UEFI keys. Then we need to generate the PK, KEK and DB and copy the Microsoft certificates into the newly created directory.
# create uefi_keys directory and navigate to it
mkdir $BSP_DIR/Linux_for_Tegra/uefi_keys
cd $BSP_DIR/Linux_for_Tegra/uefi_keys

# generate PK
openssl req -newkey rsa:2048 -nodes -keyout PK.key  -new -x509 -sha256 -days 3650 -subj "/CN=my Platform Key/" -out PK.crt

# generate KEK
openssl req -newkey rsa:2048 -nodes -keyout KEK.key  -new -x509 -sha256 -days 3650 -subj "/CN=my Key Exchange Key/" -out KEK.crt

# generate DB
openssl req -newkey rsa:2048 -nodes -keyout db_1.key  -new -x509 -sha256 -days 3650 -subj "/CN=my Signature Database key/" -out db_1.crt

# move microsoft certificates
mv ~/Downloads/{msft_db_2011.der, msft_KEK_2011.der, msft_db_2023.der, msft_KEK_2023.der} ./
For all keys and certificates, we also want to generate the corresponding EFI signature lists and save it in UEFI variables. For the Microsoft certificates, we first need to convert the Microsoft certificates from DER to PEM and then to EFI signature list. You can do this by running the following commands:
# Create unique identifier
GUID=$(uuidgen)

# Create ESL of manually generated keys
cert-to-efi-sig-list -g "${GUID}" PK.crt PK.esl
cert-to-efi-sig-list -g "${GUID}" KEK.crt KEK.esl
cert-to-efi-sig-list -g "${GUID}" db_1.crt db_1.esl

# Convert Microsoft certificates to PEM
openssl x509 -inform der -in msft_db_2011.der -out msft_db_2011.pem
openssl x509 -inform der -in msft_KEK_2011.der -out msft_KEK_2011.pem
openssl x509 -inform der -in msft_db_2023.der -out msft_db_2023.pem
openssl x509 -inform der -in msft_KEK_2023.der -out msft_KEK_2023.pem

# Create ESL of Microsoft keys
cert-to-efi-sig-list msft_db_2011.pem msft_db_2011.esl
cert-to-efi-sig-list msft_KEK_2011.pem msft_KEK_2011.esl
cert-to-efi-sig-list msft_db_2023.pem msft_db_2023.esl
cert-to-efi-sig-list msft_KEK_2023.pem msft_KEK_2023.esl
Generating the Device Tree Overlay
The UEFI keys will be provisioned by flashing a specific device tree overlay. This is done by using the script $BSP_DIR/tools/gen_uefi_keys_dts.sh. It takes a .conf file as input and will output the .dtbo to be provisioned. The .conf file should look something like this:
# Create uefi_keys.conf
cat << EOF | tee uefi_keys.conf
UEFI_DB_1_KEY_FILE="db_1.key";
UEFI_DB_1_CERT_FILE="db_1.crt";

UEFI_DEFAULT_PK_ESL="PK.esl";
UEFI_PK_KEY_FILE="PK.key";
UEFI_PK_CERT_FILE="PK.crt";

UEFI_DEFAULT_KEK_ESL_0="msft_KEK_2011.esl";
UEFI_DEFAULT_KEK_ESL_1="msft_KEK_2023.esl";
UEFI_DEFAULT_KEK_ESL_2="KEK.esl";
UEFI_KEK_KEY_FILE="KEK.key";
UEFI_KEK_CERT_FILE="KEK.crt";

UEFI_DEFAULT_DB_ESL_0="msft_db_2011.esl";
UEFI_DEFAULT_DB_ESL_1="msft_db_2023.esl";
UEFI_DEFAULT_DB_ESL_2="db_1.esl";
EOF
It should be placed in the same directory as the keys themselves.
We can now call the gen_uefi_keys_dts.sh script:
cd $BSP_DIR/Linux_for_Tegra
sudo tools/gen_uefi_keys_dts.sh uefi_keys/uefi_keys.conf
And it will output the file uefi_keys/UefiDefaultSecurityKeys.dtbo.
Provisioning the Keys
We provision the keys by running the $BSP_DIR/tools/kernel_flash/l4t_initrd_flash.sh script after booting the device into recovery. We copy the UefiDefaultSecurityKeys.dtbo into the $BSP_DIR/bootloader directory and then run the script:
sudo cp uefi_keys/UefiDefaultSecurityKeys.dtbo bootloader/

# boot device into recovery and flash using initrd_flash command
# $DEVICE is either jetson-agx-orin-devkit or jetson-orin-nano-devkit
sudo ./tools/kernel_flash/l4t_initrd_flash.sh \
    -p "-c bootloader/generic/cfg/flash_t234_qspi.xml" \
    --showlogs \
    --network usb0 \
    --qspi-only \
    --uefi-keys uefi_keys/uefi_keys.conf \
    $DEVICE external
The $DEVICE variable can be either jetson-agx-orin-devkit or jetson-orin-nano-devkit.
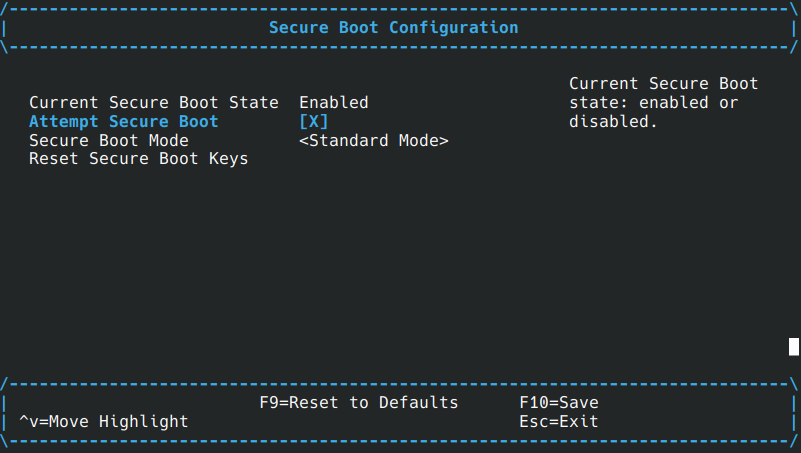
Check if Secure Boot is Enabled
You can check if secure boot is enabled or not by either going through the UEFI boot manager, or checking it once the image is booted.
Once you enter the UEFI boot manager, you can enter “Device Manager” -> “Secure Boot Configuration” and check if the box next to “Attempt Secure Boot” is checked or not.
Once the image is booted, you can simply run bootctl which will tell you if secure boot is enabled or not on the fourth line:
ubuntu@ubuntu:~$ bootctl
systemd-boot not installed in ESP.
System:
    Firmware: n/a (n/a)
    Secure Boot: enabled
    Setup Mode: setup
    TPM2 Support: no
Boot into FW: supported

Current Boot Loader:
    Product: n/a
    Features: ✗ Boot counting
            ✗ Menu timeout control
            ✗ One-shot menu timeout control
            ✗ Default entry control
            ✗ One-shot entry control
            ✗ Support for XBOOTLDR partition
            ✗ Support for passing random seed to OS
            ✗ Boot loader sets ESP information
        ESP: n/a
        File: └─n/a

Random Seed:
Passed to OS: no
System Token: not set
    Exists: no

Available Boot Loaders on ESP:
        ESP: /boot/efi (/dev/disk/by-partuuid/74de3ab3-cfa5-4d98-b078-e1762264201d)
        File: └─/EFI/BOOT/BOOTAA64.efi

Boot Loaders Listed in EFI Variables:
Boot Loader Entries:
        $BOOT: /boot/efi (/dev/disk/by-partuuid/74de3ab3-cfa5-4d98-b078-e1762264201d)

0 entries, no entry could be determined as default.