
Program an Ubuntu image
Prerequisites
Ubuntu image and boot firmware downloaded
A laptop or PC (host: x86 architecture) running Ubuntu (following instructions have been tested with 22.04 and 24.04, but should be compatible with later versions as well)
A monitor with DP port and an USB keyboard
An USB-C (device side) cable connecting the host to the device
A 2 pin jumper cap connector (only necessary for Nano/NX)
A boot media to program your image on:
SD card: cheap but don’t expect great performance
USB: for the same reasons than above, prefer a real disk than a stick
NVMe disk: must be installed to the dedicated PCIe slot
All the following commands are intended to be run as a normal user (no root).
Preparation
The Linux for Tegra tools installed with the boot firmware tarball contain scripts used to flash the software of a Jetson board, both firmware and operating system. Ubuntu image has been tested using the boot firmware linked on the Ubuntu download page for NVIDIA Jetson (note: all versions are published by Nvidia on the Linux Tegra download page and can be retrieved by clicking “Driver Package (BSP)”). In order to use the tools, first install the following packages
sudo apt install -y python3 mkbootimg bzip2 cpp device-tree-compiler
Extract the boot firmware tarball
tar xf Jetson_Linux_R36.4.3_aarch64.tbz2 && cd Linux_for_Tegra/
Install missing dependencies and fix file permissions
sudo ./tools/l4t_flash_prerequisites.sh
Put the devkit into recovery mode
While the operation is quite similar, the procedure to enable the recovery mode differs with every kit. First connect the USB cable between the host (should be type A) and the kit (type C, on AGX devkit it is the one located close to the 40-pin connector). Once the recovery mode is enabled, the host should detect an USB device 0955:7X23 NVIDIA Corp. APX, with X being one of {0,2,3,4,5,6} (see the NVIDIA Jetson Quick Start reference).
Note that once an image is up and running on the device, alternative ways could also be used:
From the Ubuntu Linux shell, run this command
sudo reboot --force forced-recovery
From the UEFI menu, enter “Device Manager” menu, then “Boot Configuration” and check the “Boot Into Recovery” option before saving, and exit the UEFI menu with “Continue”
Recovery on Jetson AGX Thor
The simplest way is to use the buttons on the front panel of the kit (see NVIDIA Jetson AGX Thor hardware layout)
Press and hold down the Force Recovery button (button 12)

Press and hold down the Reset button (button 13)
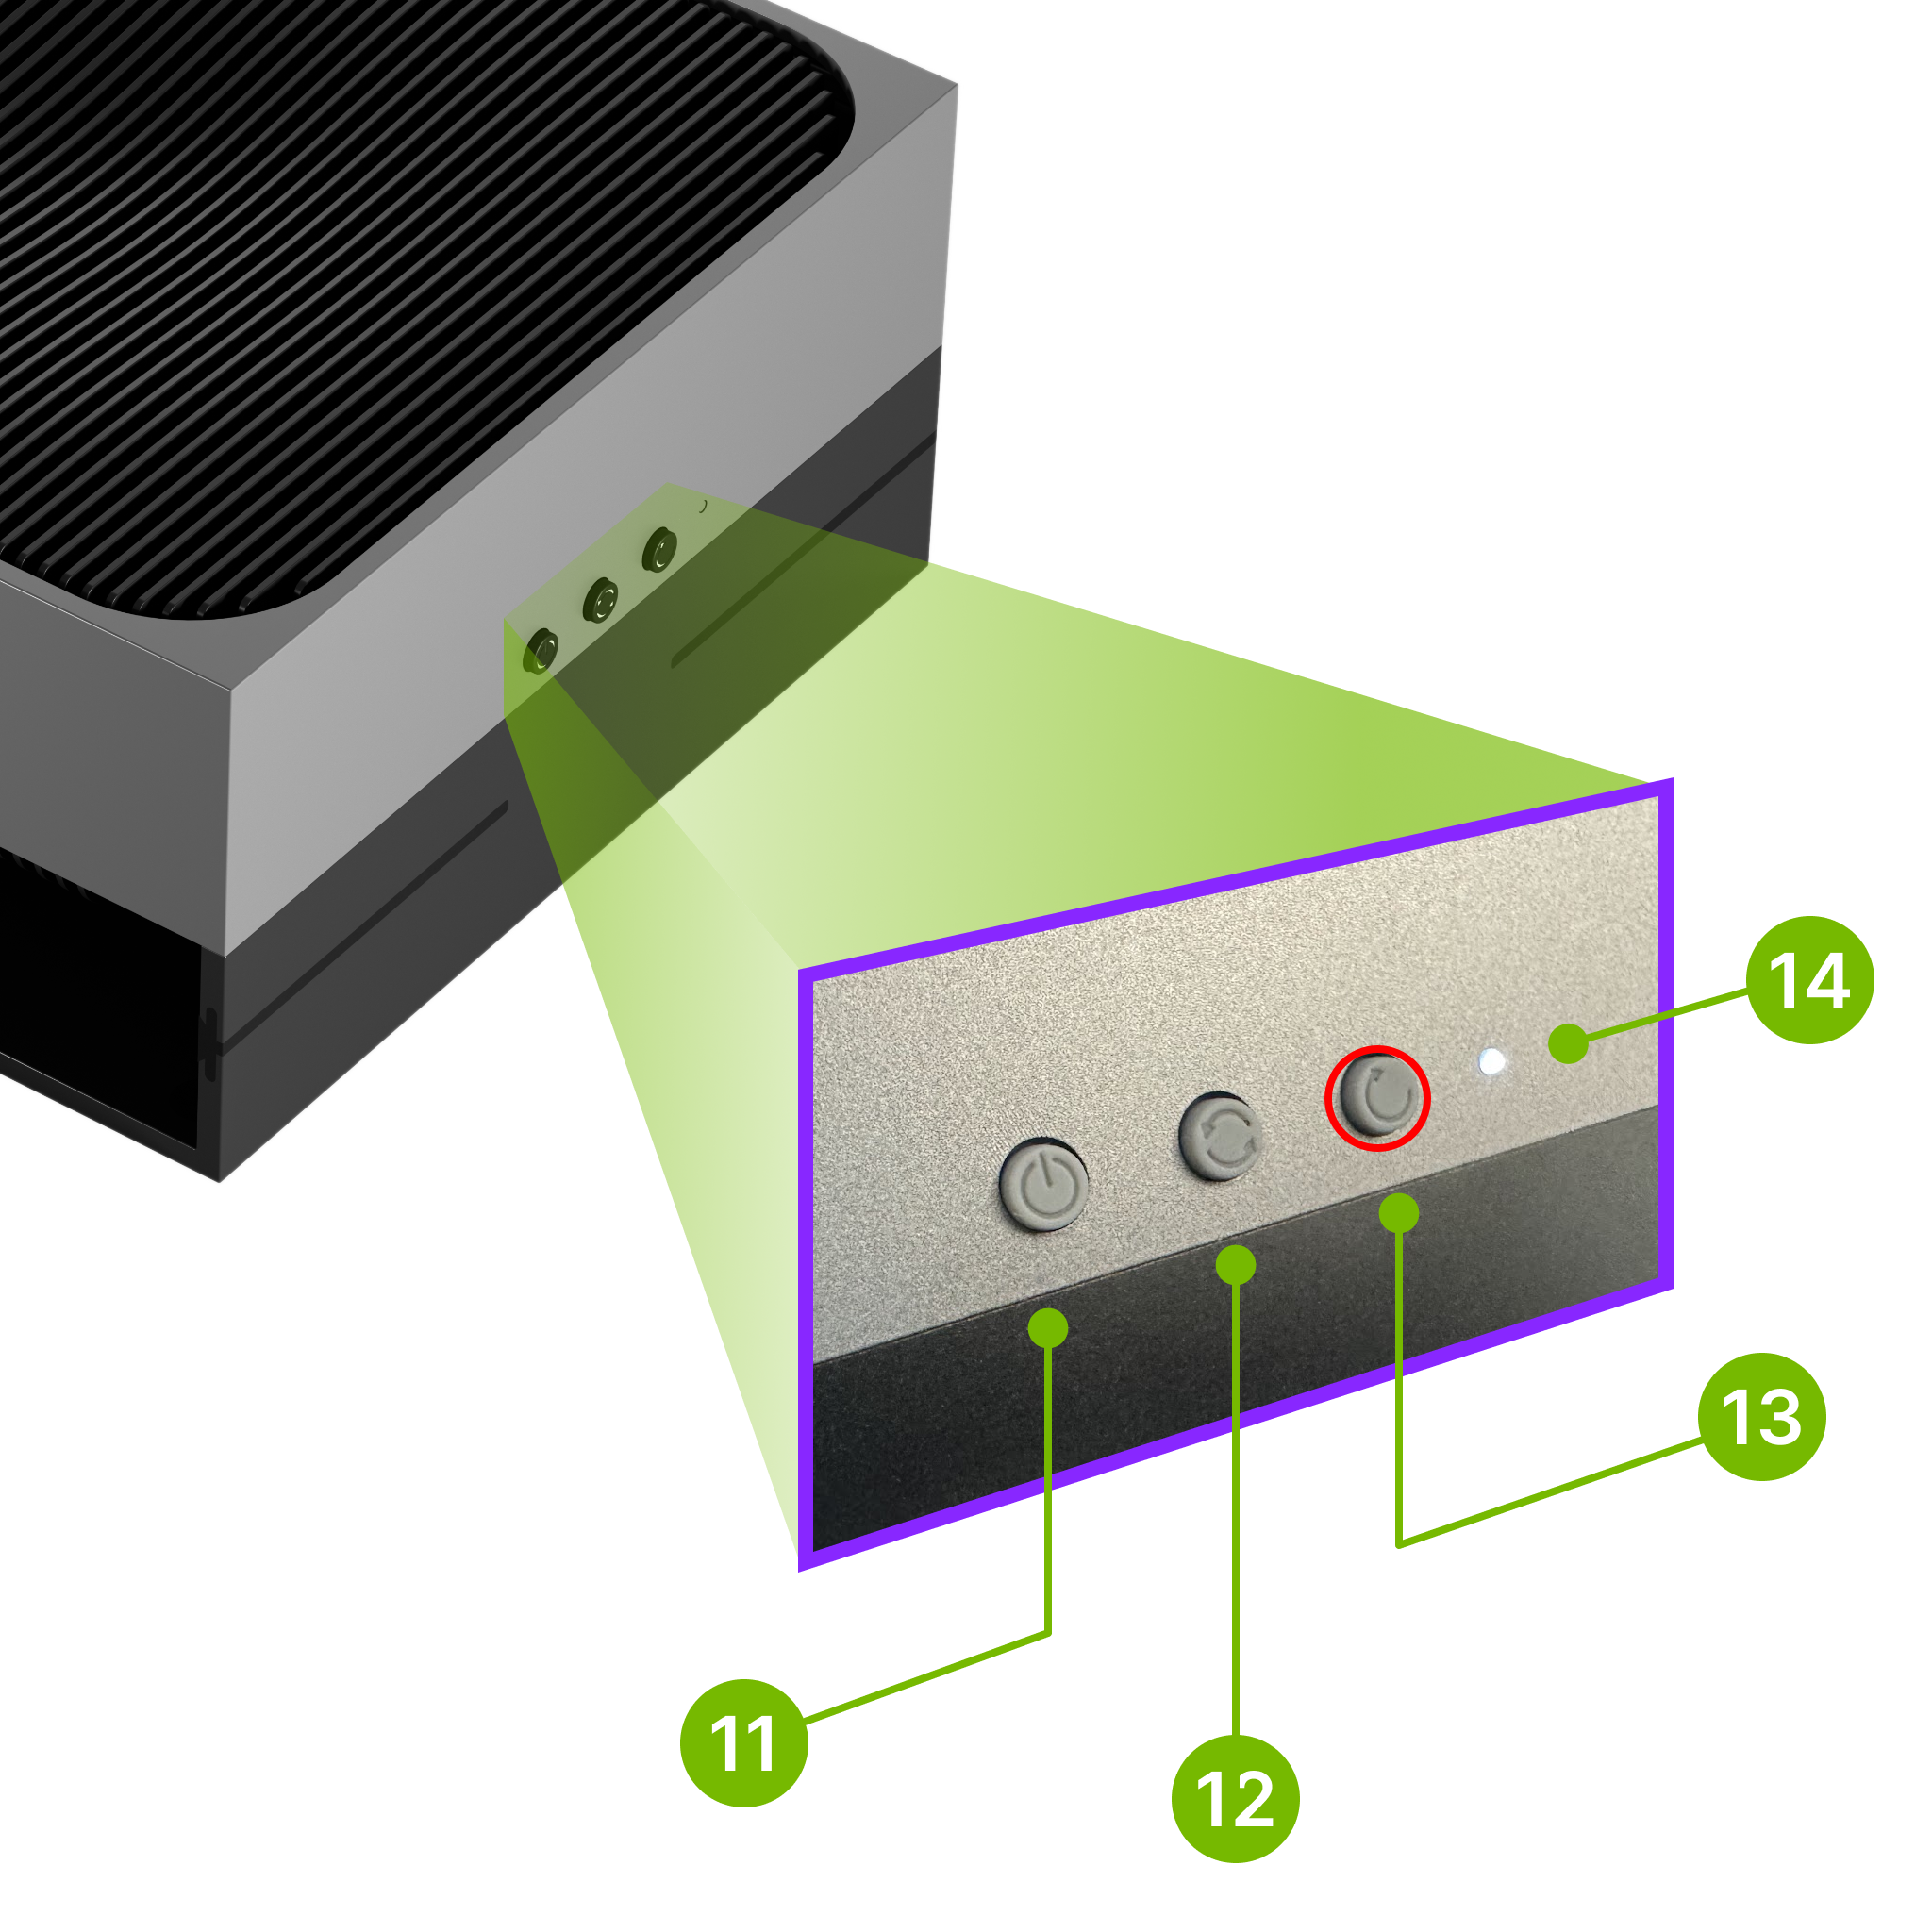
Release both buttons.
Recovery on Jetson AGX Orin
The simplest way is to use the buttons on the front panel of the kit (see NVIDIA Jetson AGX Orin user guide)
Press and hold down the Force Recovery button (button 2)
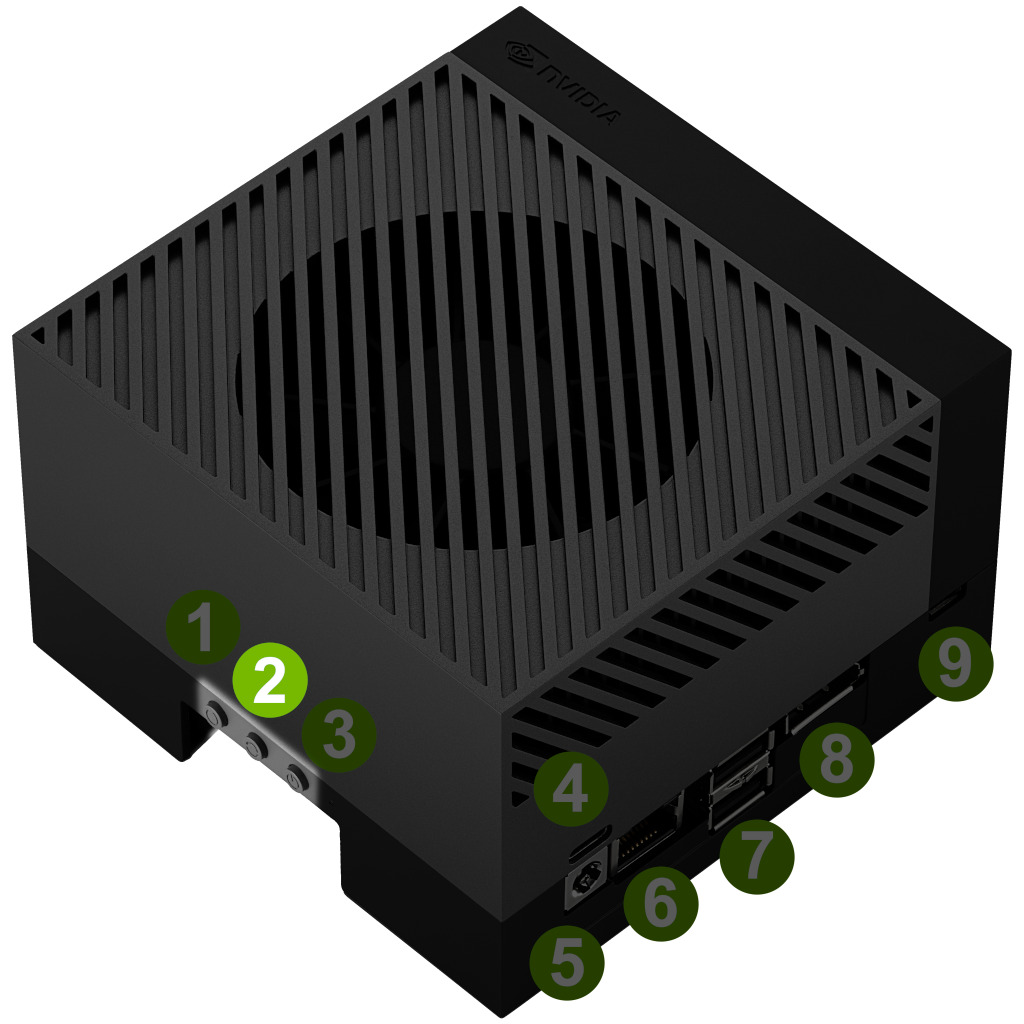
Press and hold down the Reset button (button 3)
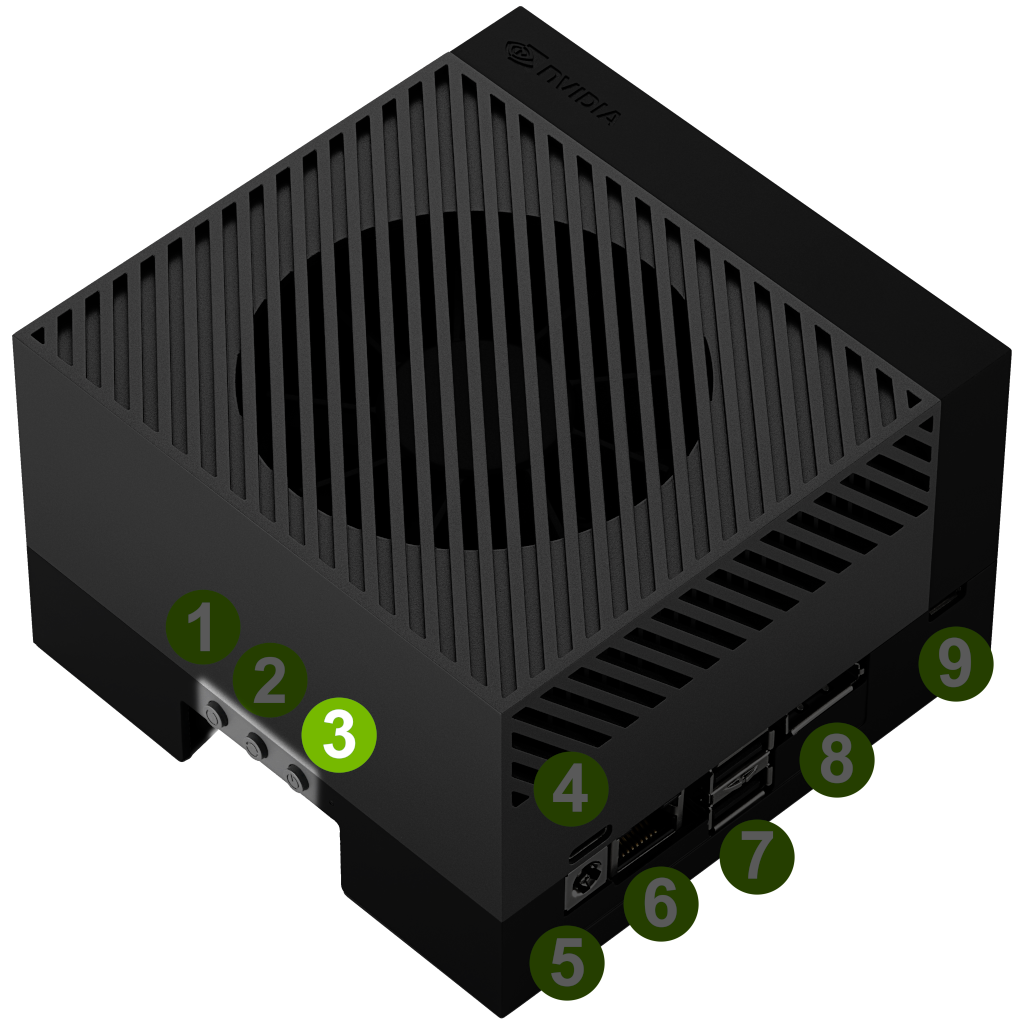
Release both buttons.
Recovery on Jetson Orin Nano/NX
With the kit powered off, connect pins 9 (
GND) and 10 (FC REC) of the 12 pins Button Header (using a 2 pins jumper cap connector, for details, check the carrier board specification)Power-on the kit
Program the boot firmware or Ubuntu image
(Optionally) Power-off the kit and remove the jumper cap connector, otherwise the next hard reboot of the kit will enable the recovery mode once again
Program the boot firmware (QSPI upgrade)
From the Linux_for_Tegra directory, enter the following command to program the latest QSPI boot firmware, it will then reboot the kit automatically upon success.
QSPI for Jetson AGX Thor
sudo ./l4t_initrd_flash.sh --qspi-only jetson-agx-thor-devkit mmcblk0p1
QSPI for Jetson AGX Orin
sudo ./flash.sh p3737-0000-p3701-0000-qspi internal
QSPI for Jetson Orin Nano/NX
sudo ./flash.sh p3768-0000-p3767-0000-a0-qspi internal
(Optional) Program a device tree overlay with the boot firmware (camera support)
While Jetpack relies on ExtLinux to boot, Ubuntu is launched by GRUB, which currently doesn’t support device tree overlay. As a consequence, in order to use a camera connected to a Jetson development kit, the related overlay must be programmed along with the boot firmware.
First, locate the appropriate .dtbo file for your camera in the Linux_for_Tegra/kernel/dtb directory, then append a ADDITIONAL_DTB_OVERLAY=<DTBO file name> argument to the command line. For instance:
# AGX devkit with LI Dual IMX274 camera module
sudo ADDITIONAL_DTB_OVERLAY=tegra234-p3737-camera-dual-imx274-overlay.dtbo ./flash.sh p3737-0000-p3701-0000-qspi internal

# Nano or NX devkit with an IMX219 camera on CSI slot 0
sudo ADDITIONAL_DTB_OVERLAY=tegra234-p3767-camera-p3768-imx219-A.dtbo ./flash.sh p3768-0000-p3767-0000-a0-qspi internal

# Nano or NX devkit with an IMX219 camera on CSI slot 0 and IMX477 camera on slot 1
sudo ADDITIONAL_DTB_OVERLAY=tegra234-p3767-camera-p3768-imx219-imx477.dtbo ./flash.sh p3768-0000-p3767-0000-a0-qspi internal
Program the Ubuntu image on your external boot media
Insert your boot media on the host and check its device name (using
lsblkordmesg)Copy the image over the boot media (assuming here it is detected as
/dev/sda)
xzcat ubuntu-22.04-preinstalled-server-arm64+tegra-igx.img.xz | sudo dd of=/dev/sda bs=16M status=progress
sudo sync
Remove the boot media from the host, insert it on the kit
(Alternatively) Program the Ubuntu image using the Nvidia L4T restore script
This method is the easiest way to program an internal disk, such as eMMC or pre-installed NVMe disk. It also allows you to program the image with limited human interaction (such as programming an external boot media with a side computer, then plugging it to the development kit).
As a prerequisite for this method, you need to put the board into recovery mode. You can then use the backup-restore tool from Nvidia to install a raw disk image on any installed media. The tool loads an initrd flash image via the USB-C cable and boots it, enabling an IPv6 network connection over USB. It relies on the nfs-kernel-server service to host the raw image, allowing a NFS mount on the development kit, connected to the host machine (which runs the script). The script will use SSH to connect to the initrd image, mount the NFS volume, and perform the raw image copy using dd. Therefore, the boot media must be connected to the development kit, and a root file system must be available on the host for the development kit to boot from. For this purpose, you should download and extract the Sample Root Filesystem provided by NVIDIA with the version of Linux for Tegra you are using (downloaded from the Jetson Linux archive), running similar commands in the Linux_for_Tegra directory:
sudo tar xf Tegra_Linux_Sample_Root-Filesystem_R36.4.3_aarch64.tbz2 -C rootfs
sudo ./apply_binaries.sh
You can now use the backup_restore tools to flash your device. From the Linux_for_Tegra directory, enter the following command :
sudo ./tools/backup_restore/l4t_backup_restore.sh -r --raw-image \
jammy-preinstalled-server-arm64+tegra-igx.img -e <device> <board-type>

# Full example
sudo ./tools/backup_restore/l4t_backup_restore.sh -r --raw-image \
jammy-preinstalled-server-arm64+tegra-igx.img -e nvme0n1 \
jetson-orin-nano-devkit
Board type:
Jetson AGX Thor:
jetson-agx-thor-devkitJetson AGX Orin:
jetson-agx-orin-devkitJetson Orin Nano/NX:
jetson-orin-nano-devkit
Device:
SD card:
mmcblk0(for devices without eMMC, like Nano or NX) ormmcblk1(for Jetson AGX)USB media:
sdaNVMe disk:
nvme0n1
Connect a monitor
You can connect to your development kit a USB keyboard/mouse and a monitor using a Display-Port cable. You can follow the boot and kernel execution on display, then get a console prompt once Ubuntu is started.
Grub
The UEFI boot loader will automatically launch GRUB, which then will launch Ubuntu.
Ubuntu login
You will be required on first boot to change your password, as the pre-installed image comes with a predefined user ubuntu (password ubuntu).
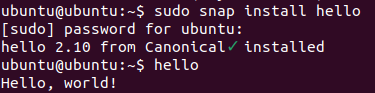
Snap
It’s Ubuntu, you can install a snap!
WLAN
You should be able to check the WLAN interface (using ip link for instance):
$ ip link show
1: lo: <LOOPBACK,UP,LOWER_UP> mtu 65536 qdisc noqueue state UNKNOWN mode DEFAULT group default qlen 1000
    link/loopback 00:00:00:00:00:00 brd 00:00:00:00:00:00
2: wlP1p1s0: <BROADCAST,MULTICAST> mtu 1500 qdisc noop state DOWN mode DEFAULT group default qlen 1000
    link/ether 90:e8:68:bc:88:a9 brd ff:ff:ff:ff:ff:ff
Ubuntu Server comes with netplan and systemd-networkd preinstalled. The initial netplan configuration in the image should already take care of the Ethernet interface. To setup a WLAN connection, you can perform the following steps to add the related configuration:
# Replace <SSID> with your SSID
SSID='<SSID>'
# Replace <PASSWD> with your password
PASSWD='<PASSWD>'
# Create a netplan configuration for the WLAN
cat <<EOF | sudo tee /etc/netplan/51-wireless.yaml
network:
  version: 2
  wifis:
    wlP1p1s0:
      dhcp4: yes
      dhcp6: yes
      access-points:
        "$SSID":
          password: "$PASSWD"
EOF
sudo netplan apply
Once applied, your network interface should get up and running after a few seconds, which you can confirm using the ip address command.